My friends take Halloween fairly seriously – and it’s always an opportunity for me to grab some interesting photos. This year however – when the chance to take costume pictures finally arrived - I was really pressed for time, low on gear, and shooting in a pretty crappy location. But Lightroom (and a little luck) came to the rescue. More after the jump…
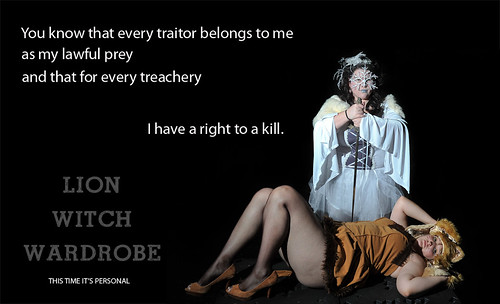
For Halloween my friends like to do group theme costumes. This year the theme was The Lion, The Witch, and the Wardrobe by C.S. Lweis. I had been hearing about their costume ideas for a while, and vaguely thinking about photo ideas. But my October schedule is always crazy; and I ended up taking their pictures late one night in an empty theatre. It was the end of a long day, I was tired; and (other than my camera) all I had was one SB800, a Lumiquest III softbox, and my PWs.
No light stands? No problem – a VAL would do the trick nicely. But the theatre wasn’t very big, and the background was crappy… so, up the shutter speed to 250/s, and try to get the flash as close as possible for maximum light falloff. Problem there is (in this case) I’ve got to shoot 2 people full body, so the flash has to be backed off enough for coverage. After a few test shots I’ve got the background dark, but not completely so… it’s the best I can do given the circumstances so we roll with it.
No light stands? No problem – a VAL would do the trick nicely. But the theatre wasn’t very big, and the background was crappy… so, up the shutter speed to 250/s, and try to get the flash as close as possible for maximum light falloff. Problem there is (in this case) I’ve got to shoot 2 people full body, so the flash has to be backed off enough for coverage. After a few test shots I’ve got the background dark, but not completely so… it’s the best I can do given the circumstances so we roll with it.
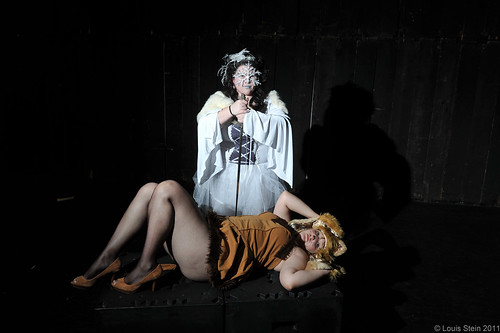 |
| Untouched, out of the camera. |
When I’m shooting fast and loose one of the first things to go is composition; and looking at this shot it’s easy to see it happening here. As much as I hate to throw away pixels, a quick crop will go a long way.
Next – and it’s here old habits die hard – I exported the photo so I could edit it in Photoshop. Why? Because it’s always been done this way. Grab the burn tool and get to work. Some 20 minutes (and many visits to Levels) later, I think I’ve got something workable. I am also very wrong.
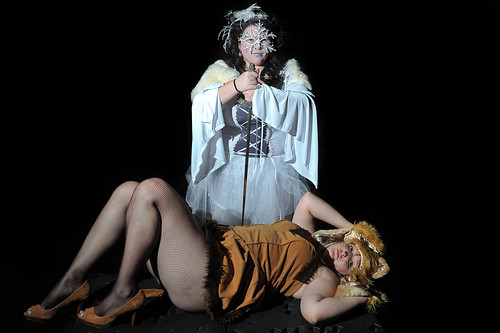 |
| After cropping (LR) and burning is PS. |
I re-import the photo back into Lightroom (mostly because I’ve going to use Lightroom later to export a web gallery). But while the background might look fine, very shortly Lightroom is going to reveal the brutal truth.
I gotta be honest; I’m still a neophyte when it comes to reading Histograms. Yeah, Yeah… I know what it’s there for; but inside whatever passes for my brain I just haven’t found the connection between looking at a histogram and how changing it changes my photo. At any rate – here I am looking at my edited photo in Lightroom, moving the mouse around, and (accidently) moving the mouse over the top left side of LR’s Histogram.
Boom. On the screen my photo goes all blue. And it’s the color of inspiration.
Ok, Ok… that’s a little dramatic (to say the least). And, yeah, I know what clipping is and that both PS and LR do it. But specifically looking at clipping just isn’t something I regularly incorporate into my workflow (and it’s here I’m gonna throw up the oft-used excuse that me=amateur). Want proof? I had to do a quick Google search to learn the hitting the “j” key in Lightroom would turn clipping on.
Alright –so, what does all that fine nonsense do for me? This….
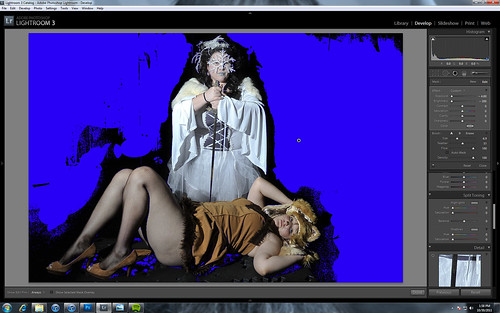
Remember: this is the copy that I’ve already spent 20 minutes burring in Photoshop. Sure, it looks fine on the monitor but (like the cake) the monitor is a lie.
Time to pop over to the Adjustment Brush in Lightroom. Exposure -4.00, Brightness -2.00. Time spent, (maybe) 5 minutes. The result….
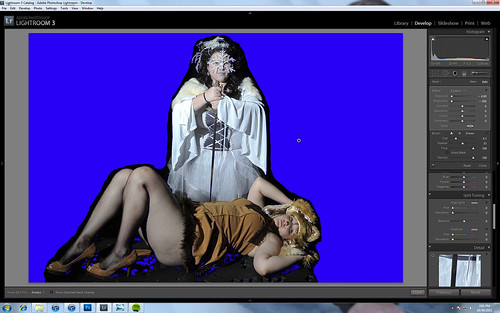
Now that’s a clean background.
One more export back to Photoshop to re-position and drop in some text (oh, and one more Google search for the appropriate quote) and I’ve got the foolishness you see at the top of this post.
But the true fool is, as always, the photographer. And my only saving grace is that I’m an old dog that (occasionally) can learn a new trick.
End of line.
No comments:
Post a Comment